


Key Takeaways
Python fingerprinting relies on request metadata, TLS attributes, and behavioral patterns to identify clients server-side.It’s commonly used in bot detection, scraping prevention, and backend fraud analysis workflows.Without client-side signals, Python fingerprints are less durable against sophisticated evasion.
Browser fingerprinting gathers data about a user's browser and device—for example, information about the device user agent, screen resolution, installed fonts, plugins, time zone, language preferences, and device and browser properties—and combines these elements to generate a unique fingerprint for each browser. Websites can use these fingerprints to identify browsers and devices, even if they clear cookies or use private browsing modes.
In this article, you'll learn how to integrate browser fingerprinting into a Django Python application using Fingerprint—a platform for browser fingerprinting that uses browser attributes to generate a unique visitor identifier. You'll also learn how to use the Fingerprint Python Server API SDK to perform additional validations to ensure that the fingerprint is reliable.
If you’re looking to strengthen your fraud defenses, now is the perfect time to start a free trial or contact our sales team to see how Fingerprint delivers accurate, multi-signal device intelligence your business can rely on.
Solution Architecture
One of the uses of fingerprinting is to identify and block malicious users. For instance, they might exploit your system by registering multiple times using different email addresses.
This tutorial will show you how to prevent this from happening using fingerprinting.
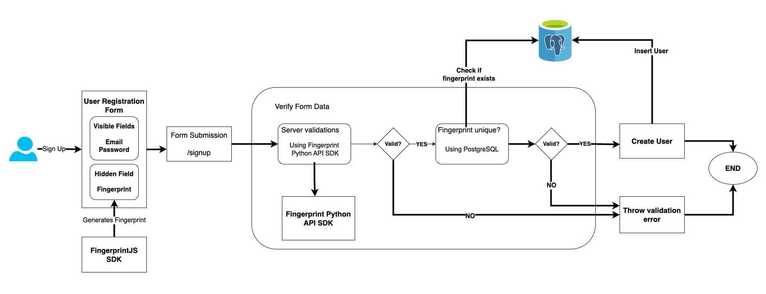
You will build a simple user-registration app using Django, a popular Python web framework. Django uses an object-relational mapping (ORM) system and integrates multiple caching methods to reduce database queries and improve response times.
You'll integrate browser fingerprinting into the user registration flow using the Fingerprint JS agent. Once the user submits the registration form, two checks will be performed to verify the fingerprint data. First, the fingerprint will be checked against the existing fingerprints in the PostgreSQL database for uniqueness. Next, additional checks will be performed using the Fingerprint Python Server API SDK to ensure validity.
The tutorial uses a PostgreSQL database to persist user information as it supports concurrent transactions and complex data types and is scalable.
Prerequisites
Before starting, you'll need to prepare by doing the following:
- Install Python.
- Install Django.
- Download and install PostgreSQL.
- Create a PostgreSQL database and user.
- Register for a free-trial of Fingerprint.
- Create a Fingerprint API key.
Ready to add device intelligence to your Python app?
Install the Fingerprint browser agent and use our Python SDK to validate visitor IDs and detect fraud from your backend.
Create a Django Application
To create a new Django application, execute the following command in your terminal:
django-admin startproject fingerprintjs_python_sampleNote: Switch to the environment before executing the command if you installed Django in a virtual environment.
The code above generates a fingerprintjs_python_sample directory with the following structure:
├── fingerprintjs_python_sample
│   ├── fingerprintjs_python_sample
│   │   ├── __init__.py
│   │   ├── asgi.py
│   │   ├── settings.py
│   │   ├── urls.py
│   │   ├── wsgi.py
│   ├── manage.py
The manage.py file acts as a command line tool, enabling you to engage with different components of the Django project.
Next, create a Django application inside the project using the following commands:
cd fingerprintjs_python_sample
python manage.py startapp userapp
The command above generates a barebones Django application under the fingerprintjs_python_sample directory:
├── fingerprintjs_python_sample
│   ├── fingerprintjs_python_sample
│   ├── userapp
│   ├── manage.py
Configure the Django project to include the userapp application. Add the following line under INSTALLED_APPS in the fingerprintjs_python_sample/settings.py file.
INSTALLED_APPS = [
    # ...
    # Add this line
    'userapp',
]
Set Up a PostgreSQL Database
The Django application generated an SQLite database by default. In this tutorial, you'll use PostgreSQL to persist user information. The PostgreSQL database supports concurrency and is scalable, so it's preferred over SQLite.
To use PostgreSQL in your Django application, you first need to install its driver. Use the following command to install psycopg, the PostgreSQL driver for Python:
pip install "psycopg[binary]"Next, you need to update the database connection settings in the settings.py file.
The file contains a DATABASES object containing the settings for all databases to be used with your Django project. Update it to use PostgreSQL instead of SQLite and provide the database connection details:
DATABASES = {
    'default': {
        'ENGINE': 'django.db.backends.postgresql',
        'HOST': 'localhost', # or your remote database host
        'PORT': 5432,
        'NAME': '<YOUR_POSTGRES_DB_NAME>',
        'USER': '<YOUR_POSTGRES_USER_NAME>',
        'PASSWORD': '<YOUR_POSTGRES_USER_PASSWORD>'
    }
}
Update the database name, username, and password values with your PostgreSQL database and user credentials.
Define the User Model
The Django project you generated includes the Django user model with common fields like username, email, and password. You can extend the default auth model if you need to store additional fields in your User table.
To define a custom User model, add the following code snippet to the userapp/models.py file:
from django.db import models
from django.contrib.auth.models import AbstractUser

class User(AbstractUser):
    fingerprint = models.CharField(max_length=200, null=True, blank=True)

    def __str__(self):
        return self.username
The custom User model extends the AbstractUser model and adds a new field for persisting the fingerprint information. To notify Django about the custom user model, add an AUTH_USER_MODEL property to the settings.py file:
# add this line at the bottom of the settings.py file
AUTH_USER_MODEL ='userapp.User'
Whenever you make a change in the database's schema, you need to run migrations to apply the changes. Execute the following command to generate the migration files based on the changes detected in the models of your Django application:
# execute it in the root of the Django project
python manage.py makemigrations
The command outputs the summary of the migration files generated:
Migrations for 'userapp':
  userapp/migrations/0001_initial.py
    - Create model User
Next, apply the migrations by executing the following command:
# execute it in the root of the Django project
python manage.py migrate
The command outputs the results of the executed migration scripts:
Operations to perform:
  Apply all migrations: admin, auth, contenttypes, sessions, userapp
Running migrations:
  Applying contenttypes.0001_initial... OK
  --- Output Omitted ---
  Applying sessions.0001_initial... OK
You can verify whether the schema changes were applied by logging in to your PostgreSQL database using a GUI or CLI tool.
Create HTML Templates
Your Django application requires frontend-facing HTML pages for sign-up and login forms. Create a templates directory in the root of the Django project and update TEMPLATES in the settings.py file to include the directory name:
TEMPLATES = [
    {
        # Update DIRS array to include templates
        'DIRS': ['templates'],
    },
]
Next, you need to define the HTML templates for the index, login, and sign-up pages.
Index Template
Your index.html file will serve as the home page of the application. It will display a welcome message if the user is logged in; otherwise, it will link to the login and sign-up pages.
Create an index.html file in the templates directory and add the following content to it:
{% if request.user.is_authenticated %}
<p>{{ request.user.username }}</p>
<a href="{% url 'logout' %}">Logout</a>
{% else %}
<a href="{% url 'login' %}">Login</a>
<a href="{% url 'signup' %}">Signup</a>
{% endif %}

<h1>Welcome!</h1>
Login Template
Your login.html page will contain a form with input fields and a button for user login.
Create a login.html file in the templates directory and add the following content to it:
<h1>Login</h1>
<form method="POST">
  {% csrf_token %} {{ form.as_p }}
  <button type="submit">Login</button>
  <a href="{% url 'signup' %}">Create Account</a>
</form>
In later sections, you'll hook up the login template with the business logic to handle the form submission and authentication.
Sign-Up Template
Your signup.html page will contain a form with input fields and a button for user registration. The template you'll use includes the Fingerprint JS agent script that generates a visitor ID and request ID. The form will gather the generated data using hidden fields.
Create a signup.html file in the templates directory and add the following content to it:
<h1>Signup</h1>

<script>
  const fpPromise = import('https://fpjscdn.net/v3/<YOUR_PUBLIC_KEY>').then((FingerprintJS) => FingerprintJS.load())

  fpPromise
    .then((fp) => fp.get())
    .then((result) => {
      const visitorId = result.visitorId
      const requestId = result.requestId

      document.querySelector('#id_fingerprint').value = visitorId
      document.querySelector('#id_requestId').value = requestId
    })
</script>

<form method="POST">
  {% csrf_token %} {{ form.as_p }}
  <button type="submit">Signup</button>
  <a href="{% url 'login' %}">Already have account?</a>
</form>
Let's go over the code for the sign-up template.
The Fingerprint JS agent's CDN version is imported within the script tag. You must replace YOUR_PUBLIC_KEY with the public key from your Fingerprint dashboard.
You could also use the open-source version of the Fingerprint library (called FingerprintJS) without any API key, but the accuracy of the open-source version is 40 to 60 percent. Using Fingerprint Pro with your API key enables the commercial version of the library, increasing its accuracy.
Once the fingerprint is generated, the value of the visitorId and requestId is added to the hidden form elements.
Create Forms in the Django App
In the previous section, you defined templates for login and sign-up, but templates don't explicitly define the form elements. Instead, it refers to the form element as {{ form.as_p }}. To define the form elements, you need to create Django forms.
Create a forms.py file under the userapp directory and add login and sign-up forms.
Login Form
Add the following code snippet to define the LoginForm with username and password fields:
from django import forms

class LoginForm(forms.Form):
    username = forms.CharField(max_length=200)
    password = forms.CharField(widget=forms.PasswordInput())
Sign-Up Form
Add the following code snippet to define the SignupForm that extends the Django auth's UserCreationForm:
from django.contrib.auth.forms import UserCreationForm
from django.core.exceptions import ValidationError
from .models import User

class SignupForm(UserCreationForm):
    email = forms.EmailField(max_length=200, help_text='Required')
    fingerprint = forms.CharField(widget=forms.HiddenInput(), required=False)
    requestId = forms.CharField(widget=forms.HiddenInput(), required=False)

    class Meta:
        model = User
        fields = ['username', 'email', 'requestId', 'fingerprint', 'password1', 'password2']

    def clean_fingerprint(self):
        fingerprint = self.cleaned_data.get('fingerprint')

        if fingerprint:
            # Check if a user with the same fingerprint already exists
	# This is only for demonstration purposes; in a real-world scenario, you should use a threshold to determine if the fingerprint was used more than n times in the last t minutes.
            existing_user = User.objects.filter(fingerprint=fingerprint).exclude(pk=self.instance.pk).first()
            if existing_user:
                raise ValidationError('Another user with the same fingerprint already exists.')

        return fingerprint

    def save(self, commit=True):
        user = super(SignupForm, self).save(commit=False)
        user.fingerprint = self.cleaned_data['fingerprint']
        if commit:
            user.save()
        return user
In this code snippet, UserCreationForm already contains the username and password fields. The form extends it to add email, fingerprint, and requestId fields.
clean_fingerprint is a validation step that queries the User table to check if fingerprint already exists. If it exists, it throws a ValidationError. Note that this validation check is only for demonstration purposes. Your users might use a shared device to sign up for your application, so you could implement rate limiting to ensure that the same fingerprint is not used more than the allowed number of times in a particular period.
The save method is invoked after form validations and creates a new user by persisting the form data to the User table. If a ValidationError was thrown, the save method won't be invoked. This ensures that the user will only be created if the browser fingerprint received in the request is unique.
Create Views
A view function takes a web request and returns a web response.
To define a view, update the views.py file under the userapp directory with the following content:
from django.shortcuts import render, redirect
from django.contrib.auth import authenticate, login, logout
from .forms import SignupForm, LoginForm


def index(request):
    return render(request, 'index.html')

def user_signup(request):
    if request.method == 'POST':
        form = SignupForm(request.POST)
        if form.is_valid():
            form.save()
            return redirect('login')
    else:
        form = SignupForm()
    return render(request, 'signup.html', {'form': form})

def user_login(request):
    if request.method == 'POST':
        form = LoginForm(request.POST)
        if form.is_valid():
            username = form.cleaned_data['username']
            password = form.cleaned_data['password']
            user = authenticate(request, username=username, password=password)
            if user:
                login(request, user)
                return redirect('home')
    else:
        form = LoginForm()
    return render(request, 'login.html', {'form': form})

def user_logout(request):
    logout(request)
    return redirect('login')
This code snippet performs standard handling for login, sign-up, and logout web requests.
Define Application URLs
To define URLs for the login, signup, and logout views in your Django application, create a urls.py file in the userapp application directory and add the following content to it:
from django.urls import path
from . import views

urlpatterns = [
    path('', views.index, name='home'),
    path('login/', views.user_login, name='login'),
    path('signup/', views.user_signup, name='signup'),
    path('logout/', views.user_logout, name='logout'),
]
Next, update fingerprintjs_python_sample/urls.py to add the urls map defined above:
# update import
from django.urls import path, include

urlpatterns = [
    # ...
    # add this line
    path('', include('userapp.urls'))
]
Additional Server Validations
In the previous section, the clean_fingerprint method in SignupForm verifies the uniqueness of the fingerprint obtained in the request. When the frontend JS agent generates a visitor_id, the Fingerprint server stores a corresponding event for it with additional metadata.
You can perform additional checks in the backend using Fingerprint's HTTP Server API or the Fingerprint Python Server API SDK to verify the form request against the stored event.
To use the Fingerprint Python Server API SDK, you first need to install its Python package. Use the following command to install it:
pip install fingerprint-pro-server-api-sdkYou can use the get_event API to fetch the fingerprint event based on requestId and use it for the following purposes:
- Verify that the
fingerprint(i.e.,visitor_id) obtained in the form is the same as what came from the visitor API. - Check the time difference between the form request and the identification event.
- Validate the confidence score of the generated
fingerprint.
To perform additional server validations, update the clean_fingerprint method to the following:
# add the following imports
import fingerprint_pro_server_api_sdk
from fingerprint_pro_server_api_sdk.rest import ApiException
import time

# init variables and SDK after the import statements in the forms.py file
min_confidence = 0.5
max_request_lifespan = 60 * 5 # 5 minutes

# init the server API SDK
configuration = fingerprint_pro_server_api_sdk.Configuration(api_key="<YOUR_SERVER_API_KEY>")
api_instance = fingerprint_pro_server_api_sdk.FingerprintApi(configuration)

def clean_fingerprint(self):
    fingerprint = self.cleaned_data.get('fingerprint')
    requestId = self.cleaned_data.get('requestId')

    if requestId:
        try:
            # Get the fingerprint from the requestId
            event = api_instance.get_event(requestId)

            event_json = event.to_dict()
            identification = event_json['products']['identification']['data']

            server_visitor_id = identification['visitor_id']
            identification_timestamp = identification['timestamp'] / 1000
            confidence = identification['confidence']['score']

            # Check if the fingerprint is valid
            time_now = int(time.time())

            if time_now - identification_timestamp > max_request_lifespan:
                raise ValidationError('Fingerprint request expired.')

            if server_visitor_id != fingerprint:
                raise ValidationError('Fingerprint forgery detected.')

            if confidence < min_confidence:
                raise ValidationError('Fingerprint confidence too low.')
        except ApiException as e:
            print("Exception when calling FingerprintApi->get_event: %s\n" % e)
            raise ValidationError('Invalid fingerprint.')

    if fingerprint:
        # Check if a user with the same fingerprint already exists
        existing_user = User.objects.filter(fingerprint=fingerprint).exclude(pk=self.instance.pk).first()
        if existing_user:
            raise ValidationError('Another user with the same fingerprint already exists.')

    return fingerprint
The code snippet initializes the Fingerprint Server API SDK, uses the get_event method to fetch identification metadata, and uses it to perform the additional server validations discussed above. It throws a ValidationError if any of the validations fails.
Remember to update the code snippet with your server API key.
Application Demo
Now that you've built your Django application and integrated the Fingerprint SDK into it, run it using the following command:
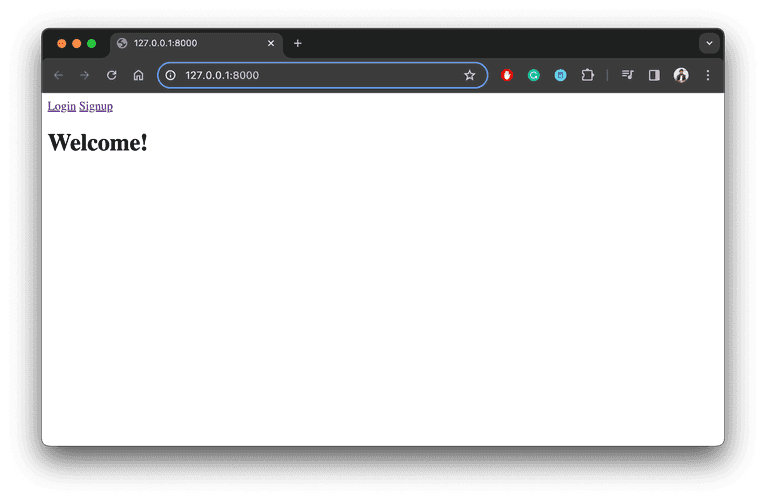
python manage.py runserverThis code will start the web server at http://127.0.0.1:8000/. When you open it in your browser, you'll see the welcome screen below:
Click on the sign-up link to open the /signup form:
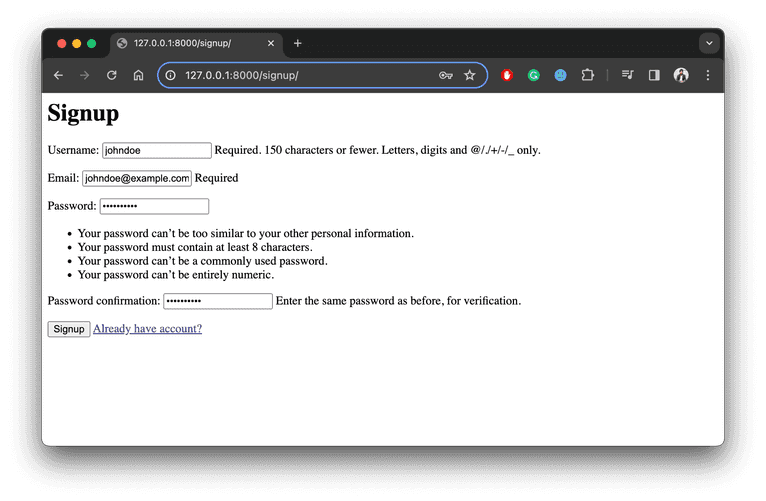
Complete the form and click Signup. If the sign-up is successful, it will redirect you to the /login page. You can verify successful sign-up by logging in to the application.
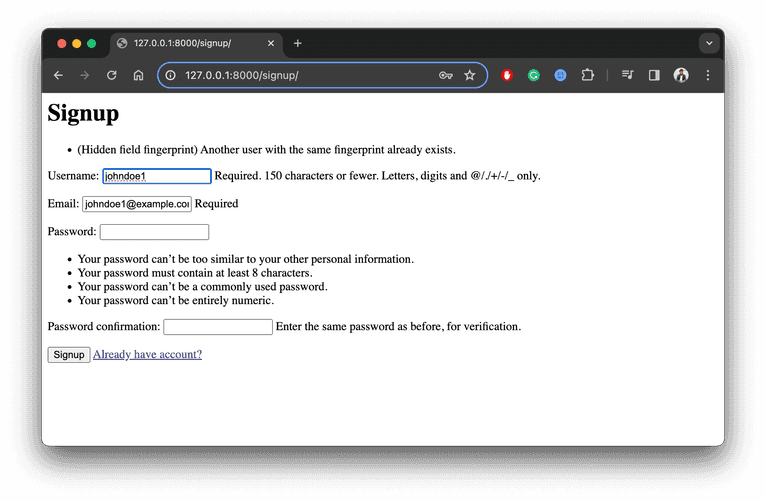
Next, log out and reopen the /signup form. You can also open the web server in incognito. Attempt to sign up with a different username and email. You will receive a validation error stating that the fingerprint already exists:
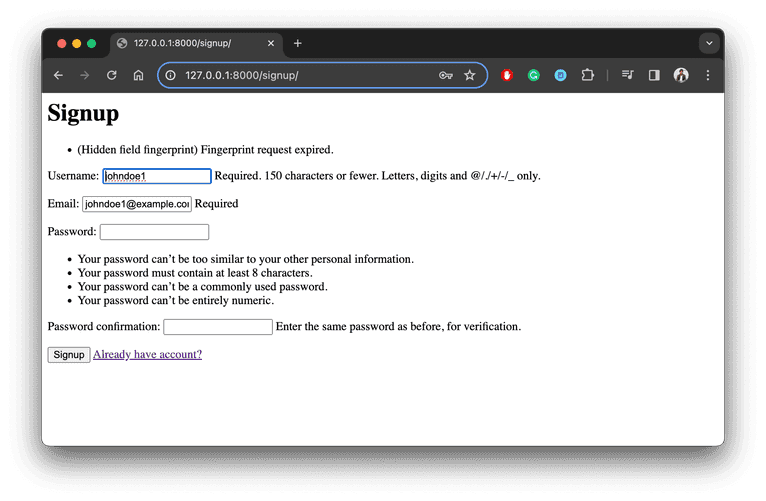
Similarly, you can verify whether the additional server validations are working by navigating to the /signup form, completing it, and waiting for longer than the life span defined in the max_request_lifespan variable (five minutes, in this case).
Conclusion
This tutorial showed you how to use the Fingerprint SDK to generate browser fingerprints in a Django application to prevent user abuse. You can find the complete source code for this tutorial on GitHub.
To identify users reliably in production, pair the Fingerprint browser agent with the Python Server API SDK. This lets your Django or Flask backend validate visitor IDs, link sessions, and detect fraudulent or abusive behavior with industry-leading accuracy.
Ready to add device intelligence to your Python app?
Install the Fingerprint browser agent and use our Python SDK to validate visitor IDs and detect fraud from your backend.
Frequently Asked Questions
What is browser fingerprinting?
Browser fingerprinting is a method to uniquely identify website users by analyzing details about their web browsers to generate an identifier. This information can include details like browser version, screen resolution, and installed fonts to uniquely identify a user's device.
What are the benefits of adding browser fingerprinting to your app?
Adding browser fingerprinting to your app can enhance security by detecting and preventing fraudulent activities. It can also be used to improve user experience by enabling personalized settings without requiring logins.
Why use browser fingerprinting over cookies?
Browser fingerprinting provides a much more persistent form of visitor identification than cookies, which users can easily clear or block. It allows for effective identification and fraud detection capabilities even with stricter privacy settings and cookie restrictions.


