Like recognizing your car by its bumper sticker and unique dents, fingerprinting is a technique that collects a combination of details about users' devices to identify them online. It's often used in fraud detection to make sure you are who you say you are.
Fingerprinting uses various techniques to collect information about a user's device, such as the screen resolution, device model, operating system, time zone, preferred language settings, and specific characteristics, like the CPU and graphics card capabilities. Applications can use these fingerprints to identify devices, even if the app cache or data is erased.
In this article, you'll learn how to integrate device fingerprinting into a Kotlin-based Android application using Fingerprint Pro Android SDK—a publicly available library for device fingerprinting that uses device attributes to generate a unique visitor identifier through a hashing process.
Prerequisites
Before you get started, make sure you have these prerequisites:
- Install the latest version of Android Studio.
- Sign up for a fourteen-day trial Fingerprint account.
- Clone the starter code for the app from this GitHub repository branch.
Install the Fingerprint Android SDK
Start by opening the cloned starter code in Android Studio and allow it to synchronize all files. This process might take a few minutes.
Upon opening the code, you'll notice some errors in the MainActivity.kt file. Don't worry—you'll fix them in the subsequent sections.
Fingerprint offers two variants of the Android Fingerprint library:
- A free and open source
fingerprintjs-androidlibrary - A commercial
fingerprint-android-prolibrary
The commercial library collects many more attributes than the open source library. It also uses advanced fingerprinting and matching algorithms to create a unique device identifier boasting industry-leading accuracy.
For this tutorial, you'll install and use the commercial Android fingerprint library, which the fourteen-day free trial gives you access to.
Open the app/build.gradle.kts file and add the dependency below to install the library:
implementation ("com.fingerprint.android:pro:2.4.0")Open the settings.gradle file and add the missing lines in the code below. It will instruct Gradle on the repository to look for the above dependency:
dependencyResolutionManagement {
    repositoriesMode.set(RepositoriesMode.FAIL_ON_PROJECT_REPOS)
    repositories {
        google()
        mavenCentral()

        // Add the lines below
        maven {
            url = uri("https://jitpack.io")
        }
        maven { url =uri("https://maven.fpregistry.io/releases") }
    }
}
Sync your project to download and install the library.
Add Fingerprinting to Your App
To add fingerprinting to your app, you'll first create a file that will contain the code for getting users' unique identifiers using the Fingerprint library.
Open the folder app/src/main/java/com/fingerprint/kotlin/ and create a new file named FingerPrint.kt. Add the following code to this file:
package com.fingerprint.kotlin

import android.content.Context
import android.util.Log
import com.fingerprintjs.android.fpjs_pro.Configuration
import com.fingerprintjs.android.fpjs_pro.FingerprintJSFactory

class FingerPrint(context: Context) {
    // Initialization
    val factory = FingerprintJSFactory(context)
    val configuration = Configuration(
        apiKey = "your-public-api-key",
        region = Configuration.Region.EU
    )

    val fpjsClient = factory.createInstance(
        configuration
    )

    var visitorId: String? = null
    var requestId: String? = null

    init {
        getVisitorId()
    }
    private fun getVisitorId() {
        fpjsClient.getVisitorId { result ->
            Log.d("--FINGERPRINT--",result.toString())
             visitorId = result.visitorId
             requestId = result.requestId
        }
    }
}
In the code above, visitorId represents the unique identifier for the user, which is their fingerprint. To get the visitorId, the code uses the FingerprintJSFactory class to initialize the library.
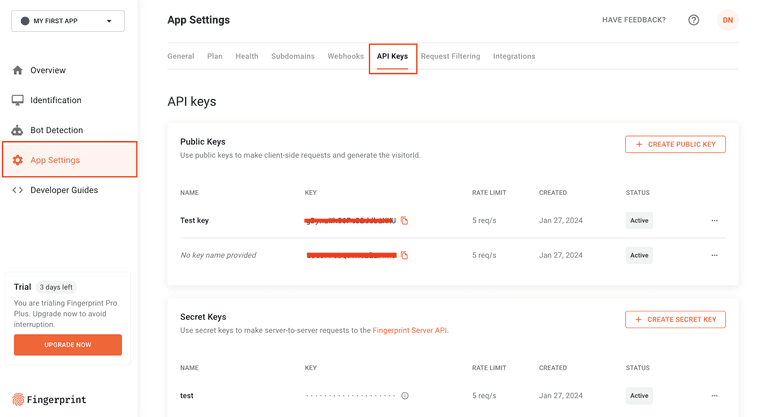
The code also provides configurations to instantiate this class properly. These configurations include the public apiKey and the region associated with your API key. You can obtain your API key from the Fingerprint dashboard at App Settings > API Keys.
Apart from the visitor identifier, the library returns more fields, of which the following are the most important:
requestId: a unique representation of the request made tofingerprintjsconfidenceScore: a score ranging from 0 to 1 that indicates the accuracy of the device identification
To set up the Fingerprint class, you must instantiate it and get the visitor identifier. This can be done at any time in the application's lifecycle, depending on your application's needs. For this tutorial, you will get the identifier on the app start-up.
Open the MainActivity.kt file and add the two lines of code shown below:
// Add the line below
var fingerPrint: FingerPrint? = null

class MainActivity : ComponentActivity() {
    override fun onCreate(savedInstanceState: Bundle?) {
        super.onCreate(savedInstanceState)

        setContent {
            // Add the line below
            fingerPrint = FingerPrint(context = LocalContext.current)
        }
    }
}
Build a Backend
Your app now has access to the unique visitor identifier of its users using the Fingerprint Android library. However, it also needs a backend to store and retrieve this information.
In this section, you'll build a simple backend to sign up and authenticate a user from your Android app. The backend will perform additional server validations using the Fingerprint Server APIs. This step confirms that the identifier was truly generated by Fingerprint. It also provides more details, such as the confidence score that indicates the level of accuracy of the device fingerprinting process, the Android application ID, details on the Android device, and the associated IP address. These details provide insights into the user's device environment, geographical location, and network information for detecting fraudulent activities.
Remember that server validations should be done on the backend server and never on the client side to minimize the risk of request interception and manipulation, leading to inaccurate and forged data.
Head to https://start.ktor.io/ and generate a quick starter backend app without any plugins. Download the app generated and open it in Android Studio. Open the build.gradle.kt file and add the following dependencies:
plugins {
    // Add the line below
    id("org.jetbrains.kotlin.plugin.serialization") version "1.9.22"
}

dependencies {
    implementation("io.ktor:ktor-server-content-negotiation-jvm")
    implementation("io.ktor:ktor-serialization-kotlinx-json-jvm")
    implementation ("de.svenkubiak:jBCrypt:0.4.1")
    implementation("io.ktor:ktor-client-core:$ktor_version")
    implementation("io.ktor:ktor-client-cio:$ktor_version")
    }
Sync the project to download and install the dependencies. (This may take a few minutes.)
Once syncing is done, create a new file called models/User.kt. This file will describe the details of your user registering and logging in to your app and define a function to validate the fingerprint received in the signup request using the Fingerprint Server API.
Add the following content to the file:
package com.example.models

import io.ktor.client.HttpClient
import io.ktor.client.call.body
import io.ktor.client.request.get
import io.ktor.client.request.header
import io.ktor.http.ContentType
import io.ktor.http.HttpHeaders
import kotlinx.serialization.Serializable
import kotlinx.serialization.json.Json
import org.mindrot.jbcrypt.BCrypt
import java.util.Date
import kotlin.Exception

@Serializable
data class User(
    val name: String,
    val password: String,
    val email: String,
    val visitorId: String?,
    val requestId: String?
)

@Serializable
data class EventResponse(val products: Products)

@Serializable
data class Products(val identification: Identification)

@Serializable
data class Identification(val data: IdentificationData)

@Serializable
data class IdentificationData(
    val visitorId: String,
    val timestamp: Long,
    val confidence: Confidence
)

@Serializable
data class Confidence(val score: Int)

data class ValidatationResult(val success: Boolean, val errorMessage: String? = "")

val maxRequestLifespan = 5 * 60 * 1000;
val minConfidence = 0.5
val userStorage = mutableListOf<User>()

fun hashPassword(plaintextPassword: String): String {
    val salt = BCrypt.gensalt()
    return BCrypt.hashpw(plaintextPassword, salt)
}

fun checkPassword(plaintextPassword: String, hashedPassword: String): Boolean {
    return BCrypt.checkpw(plaintextPassword, hashedPassword)
}

suspend fun validateFingerprintData(requestId: String, visitorId: String?): ValidatationResult {
    val client = HttpClient()

    try {
        val response = client.get("https://api.fpjs.io/events/$requestId") {
            header(HttpHeaders.Accept, ContentType.Application.Json.toString())
            header("Auth-API-Key", "your-secret-api-key")
        }
        val stringBody: String = response.body()

        client.close()

        val respJson = Json {
            ignoreUnknownKeys = true
        }.decodeFromString<EventResponse>(stringBody)
        val identification = respJson.products.identification.data

        val serverVisitorId = identification.visitorId
        val identificationTimestamp = identification.timestamp
        val confidence = identification.confidence.score

        val timeNow = Date().time

        if (timeNow - identificationTimestamp > maxRequestLifespan) {
            return ValidatationResult(false, "Fingerprint request expired.")
        }

        if (!serverVisitorId.equals(visitorId)) {
            return ValidatationResult(false, "Fingerprint forgery detected.")
        }

        if (confidence < minConfidence) {
            return ValidatationResult(false, "Fingerprint confidence too low.")
        }
    } catch (exception: Exception) {
        println(exception.message)
        return ValidatationResult(false, "Invalid fingerprint.")
    }

    return ValidatationResult(true);
}
This code contains the validateFingerprintData function that uses the get event by requestId API to fetch fingerprint metadata based on the requestId. When the Android Flutter SDK generates a visitor_id, the Fingerprint server saves a corresponding event and additional metadata, which can be fetched through this API. The validateFingerprintData function performs the following checks:
- Verifies the
visitor_idreceived in the signup request against the one stored in Fingerprint servers. - Checks whether the fingerprint data has expired by comparing the current time with the timestamp at which the fingerprint was generated. In this example, it treats requests older than five minutes as expired.
- Asserts that the confidence score of the fingerprint is higher than a set threshold. In this example, it expects the minimum confidence score to be above 0.5.
Remember to get your server-to-server secret key from Dashboard > App Settings > API Keys and use it with the code above.
Opening the link http://0.0.0.0:8080/admin/request/<request-id> or http://0.0.0.0:8080/admin/visitor/<visitor-id> will display details about the unique identifier from the Android library.
Next, open the file plugins/Routing.kt, which is where you will register all the routes on your app. You will also write the logic to handle all the matched routes.
Add the following code to the file:
routing {
    get("/") {
        call.respondText("Hello World!")
    }

    route("/user") {
        post("/login") {
            val formParameters = call.receiveParameters()
            val email = formParameters["email"].toString()
            val password = formParameters["password"].toString()
            val visitorId = formParameters["visitorId"].toString()
            val requestId = formParameters["requestId"].toString()
            println("----$visitorId")
            val user =
                userStorage.firstOrNull {
                    it.email == email && checkPassword(
                        password,
                        it.password
                    )
                }
            if (user != null) {
                println(user)
                if (user.visitorId == visitorId) {
                    call.respond(user)
                } else {
                    // If the fingerprint in the login request doesn't match their user profile, it
                    // indicates that they are using a different device.
                    // This sample API returns an error for this scenario. Still, in a real-world
                    // application, you could ask for a 2FA authentication such as OTP, TOTP, etc.
                    call.respond(JsonPrimitive("NEW DIGITAL FINGERPRINT DETECTED!!!"))
                }
            } else {
                call.respond(JsonPrimitive("USER NOT FOUND!!!"))
            }
        }
        post("/sign-up") {
            val formParameters = call.receiveParameters()
            val email = formParameters["email"].toString()
            val password = formParameters["password"].toString()
            val name = formParameters["name"].toString()
            val visitorId = formParameters["visitorId"].toString()
            val requestId = formParameters["requestId"].toString()
            println("----$visitorId")
            val exists =
                userStorage.firstOrNull() { t -> t.visitorId == visitorId || t.email == email }
            if (exists == null) {
                val validations = async { validateFingerprintData(requestId, visitorId) }
                val validationResult = validations.await()

                if (validationResult.success) {
                    val user = User(
                        name = name,
                        email = email,
                        password = hashPassword(password),
                        visitorId = visitorId,
                        requestId = requestId
                    )
                    userStorage.add(user)
                    println(user)
                    call.respond(user)
                } else {
                    call.respond(JsonPrimitive(validationResult.errorMessage))
                }
            } else {
                call.respond(JsonPrimitive("USER WITH THE SAME EMAIL OR visitorId EXISTS!!!"))
            }

        }
    }
}
The code above describe two routes for a user: login and sign-up. During user sign-up, the code performs fingerprint validations and stores the data from the Android app while also hashing the password. This data includes the visitorId and requestId from the fingerprintjs-android library. It returns an error response if a user with the same fingerprint already exists, but this is only for demonstration purposes. To account for instances where your users might use a shared device for signing up for your application, you could implement rate limiting to ensure that a single fingerprint isn't used beyond the permitted frequency within a specific timeframe.
When authenticating a user, the route checks if the details passed (email and password) match any record previously stored. If a match is positive, it checks if the visitorId passed from the app matches the one retrieved from the record. A successful match returns the user's details; otherwise, it returns a message describing the issue (ie USER NOT FOUND). Note that in a real-world application, you would want to present the user with a second-factor authentication (2FA) option such as an OTP or TOTP to verify their authenticity.
Finally, open the Application.kt file and add the code below to enable JSON serialization on the backend app:
fun Application.configureSerialization() {
    install(ContentNegotiation) {
        json()
    }
}

fun Application.module() {
// Add the line below
configureSerialization()
}
To test the app, run the following commands on the terminal:
./gradlew build
./gradlew run
On your Android app, open the file Network.kt, which contains the code to make API requests from the app. Update the base URL with your local machine IP address (you can get it from the Wi-Fi settings on your machine), which will be something similar to this:
private const val LOCAL_BASE_URL = "http://192.168.88.247:8080/user/"You can now run the Android app to test out the features you just implemented.
You can find the complete app's source code as well as the Kotlin backend server on GitHub.
Advantages of Fingerprint
Traditional methods of identifying users and their devices on Android are becoming either outdated or harder to access due to evolving Google terms and privacy restrictions.
For instance, Android developers traditionally generated and stored a unique identifier on a device to track users. However, this identifier changes or gets lost when the app is uninstalled or data is cleared.
Fingerprint technology addresses this limitation by collecting data such as hardware details (CPU architecture, screen resolution, etc.), operating system properties (version number, fonts), and device settings (language, time zone) and creates a unique identifier for each user that is stored on your server. This means this identifier persists across app installs to enhance fraud detection and security.
Another method traditionally used to track users is unique identifiers like MAC addresses and IMEI numbers. However, recent Android versions (10 and above) limit access to these identifiers due to privacy concerns. Google now requires justification for their use, making them impractical for most apps.
Fingerprint technology sidesteps this issue by collecting accessible data like hardware details, operating system properties, and device settings. Even though it doesn't require special permissions, it gathers a wide enough range of information to effectively create a unique identifier that's consistent across app installs and devices.
Conclusion
This article showed you how to get a fingerprint for an Android Kotlin app using the Fingerprint Android library. By combining information about the device and application, the Fingerprint library generates a unique and consistent identifier (visitorId) for each user. Server-side validation ensures authenticity and provides additional details like a confidence score.
Fingerprint offers a convenient and stable way of getting unique identifiers—and it boasts industry-leading accuracy. Sign up for a trial to try it out.
Frequently Asked Questions
What is device fingerprinting?
Device fingerprinting is a technique used to uniquely identify devices by examining their characteristics. This can involve information such as device model, operating system, and device capabilities to create a unique identifier for the device.
What are the benefits of adding device fingerprinting to your app?
Integrating device fingerprinting into your app can boost security by uniquely identifying devices and preventing fraud by comparing device fingerprints with their related activity. Additionally, it can enhance user experience by enabling personalized settings without needing to log in.
How can device fingerprinting enhance user authentication?
Device fingerprinting creates a unique identifier from the device's hardware and software attributes, helping detect unrecognized devices. This allows for more accurate user identification and can trigger additional verification steps when anomalies are detected, thus preventing unauthorized access and improving overall app security.