
Almost every web developer has to combat fraud at some point. Attacks might include malicious users trying to brute force passwords, place fraudulent orders, initiate bot attacks, or bypass your site’s paywall.
Traditional methods of tracking users in PHP often fall short when preventing fraud. This is where browser fingerprinting comes in. Browser fingerprinting is a technique that generates a highly accurate identifier that can uniquely identify someone based on their browser and device settings.
Why Browser Fingerprinting?
Browser fingerprinting has many practical applications — from helping block malicious users to fighting bank fraud:
- Combating Malicious Users - Browser fingerprints can help identify when a user trying to register is a bot rather than a real person. Fingerprints can also help detect when a malicious user is using a legitimate account.
- Preventing Financial Fraud - You can use fingerprints to detect and stop malicious users from testing stolen credit cards by making many small purchases on your site from different credit cards.
- Enforcing paywalls - Sometimes, tech-savvy readers use incognito mode or delete their cookies to bypass paywalls and access restricted content. Using browser fingerprints, you can catch users bypassing your paywall to ensure your business isn’t losing revenue.
Browser Fingerprinting in PHP
Suppose you are running a streaming site that offers a 14-day free trial to new users. However, a malicious user can repeatedly register with different email addresses to take advantage of your trial offer.
Unfortunately, PHP is exclusively a server-side programming language, so you can’t implement browser fingerprinting in PHP alone. But, by implementing Fingerprint on your frontend, you can easily add fingerprinting to prevent the same user from registering in your application with multiple email addresses.
In this tutorial, I’ll show you how to use Fingerprint to generate browser fingerprints for your PHP application. I’ll contrast fingerprinting with several traditional PHP-only ways to track users (session tracking, HTTP cookies, and IP address tracking) so you understand why fingerprinting is a more reliable solution in most cases.
Project Setup
Following this tutorial must have PHP and SQLite3 installed on your system. You can find the finished code for this tutorial on Github with the files for the initial project setup in the ./original directory.
Once you have the dependencies ready, create a file called register.php:
<?php
$db = new SQLite3("data.db");

if($_SERVER["REQUEST_METHOD"] == "POST"){

    if(empty($_POST['email'])) {
        die("Email is required");
    } else if(empty($_POST['password'])) {
        die("Password is required");
    } else {
       $stmt = $db->prepare("SELECT * FROM users WHERE email = ?");
       $stmt -> bindValue(1, $_POST["email"], SQLITE3_TEXT);
       $res = $stmt->execute();

       if(($res->fetchArray())[0]) {
           die("Email already exists");
       } else {
           $insert_stmt = $db->prepare("INSERT INTO users(email, password, visitorId) VALUES(?, ?, ?)");
           $insert_stmt -> bindValue(1, $_POST["email"], SQLITE3_TEXT);
           $insert_stmt -> bindValue(2, password_hash($_POST["password"], PASSWORD_BCRYPT), SQLITE3_TEXT);
           $insert_stmt -> bindValue(3, $_POST["visitorId"], SQLITE3_TEXT);
           $res = $insert_stmt->execute();

           if($res) {
               header('Location: dashboard.html');
           } else {
               die("An error occurred");
           }
       }


    }
}

?>
<!DOCTYPE html>
<html lang="en">
<head>
    <meta charset="UTF-8">
    <title>Sign Up</title>
    <link href="https://unpkg.com/tailwindcss@^2/dist/tailwind.min.css" rel="stylesheet">
    <meta name="viewport" content="width=device-width, initial-scale=1.0" />
</head>
<body>
    <div class="flex h-screen bg-blue-700">
        <div class="max-w-lg m-auto bg-blue-100 rounded p-5">
            <h2 class="text-xl">Sign Up</h2>
            <p class="text-sm">Please fill this form to create an account.</p>
            <form class="p-3" action="<?php echo htmlspecialchars($_SERVER["PHP_SELF"]); ?>" method="post">
                <div class="form-group">
                    <label class="block mb-2 text-blue-500">Email</label>
                    <input
                    class="w-full p-2 mb-6 text-blue-700 border-b-2 border-blue-500 outline-none focus:bg-gray-300"
                    type="text" name="email">

                </div>
                <div class="form-group">
                    <label class="block mb-2 text-blue-500">Password</label>
                    <input class="w-full p-2 mb-6 text-blue-700 border-b-2 border-blue-500 outline-none focus:bg-gray-300" type="password" name="password">
                </div>

                <div class="form-group">
                    <input class="w-full bg-blue-700 hover:bg-pink-700 text-white font-bold py-2 px-4 mb-6 rounded" type="submit" value="Submit">

                </div>

            </form>
            <footer>
                <a class="text-blue-700 hover:text-pink-700 text-sm float-left" href="#">Log In</a>
            </footer>
        </div>

    </div>
</body>
</html>
This simple registration form uses SQLite as its database and TailWind CSS to look presentable.
Next, create a file called dashboard.html in the same folder:
<!DOCTYPE html>
<html>
 <head>
    <meta charset="UTF-8">
    <title>Dashboard</title>
    <link href="https://unpkg.com/tailwindcss@^2/dist/tailwind.min.css" rel="stylesheet">
    <meta name="viewport" content="width=device-width, initial-scale=1.0" />
</head>
<body>
    <div class="flex h-screen items-center justify-center bg-blue-700">
        <h1 class="text-6xl text-white">Welcome, user</h1>
    </div>
</body>
</html>
After successful registration, a simple HTML page appears.
Finally, create the database using SQLite:
sqlite3 data.dbThis action will create a file called data.db and provide you with a sqlite prompt. Next, run the following query in the prompt to create a users table with an id, email, and password field:
CREATE TABLE users(
    id INTEGER PRIMARY KEY AUTOINCREMENT,
    email TEXT UNIQUE,
    password TEXT
);
Finally, press CTRL-D to exit the sqlite prompt.
You are now ready to test user registration. Start the PHP server on port 8000.
php -S localhost:8000Now, open your browser and navigate to http://localhost:8000/register.php. You should see a screen like this:
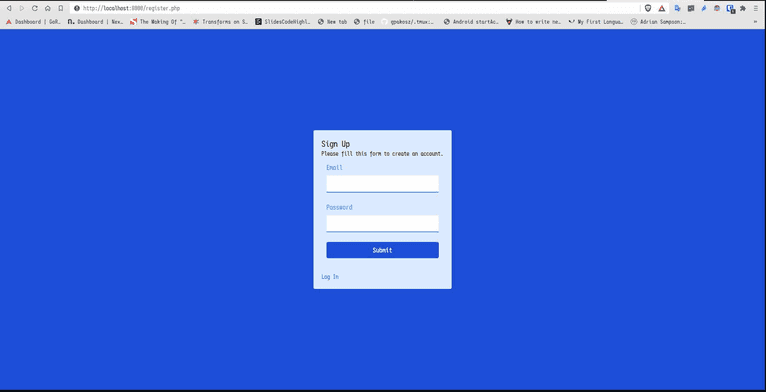
Try registering a user with some email and password. Once successfully registered, you should be redirected to the dashboard.

Come back to the register.php page again and try registering again with a different email. You will see that the app allows you to re-register.
In the next section, I’ll show you how to prevent re-registration using browser fingerprinting integrated with your PHP application. Before you continue, wipe your database clean to avoid any conflicts.
Using Fingerprint
Fingerprint is a device identification and browser fingerprinting service that uses a combination of fingerprinting, cookies, server-side techniques, and machine learning to generate a browser fingerprint that is highly accurate.
To get started with Fingerprint, you will need a Fingerprint Pro account. If you do not have an account, you can start a 14-day free trial with no credit card required.
Once you have an account, visit your dashboard and select the subscription that you created while registering. Head to the API Keys section from the left sidebar and copy the active public API key.
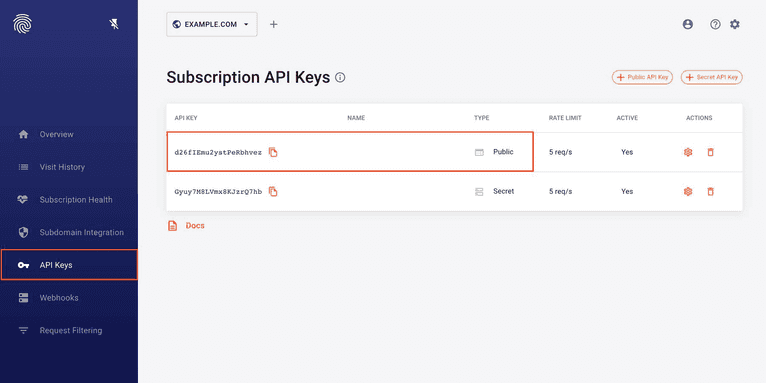
After you have the API key, install the JavaScript agent. This JavaScript agent will run in the browser, so you do not need a backend PHP component to generate the fingerprint. The required snippet can either be downloaded from a CDN (content delivery network) or installed through NPM. In this example, I’ll use a CDN.
Inside your PHP application’s HTML, add the following to your <head> tag:
<script
  async
  src="https://cdn.jsdelivr.net/npm/@fingerprintjs/fingerprintjs-pro@3/dist/fp.min.js"
  onload="initFingerprintJS()"
></script>
This snippet downloads the required JavaScript file and runs the initFingerprintJS() function. Let's create the function (before the previous <script> tag):
<script>
  function initFingerprintJS() {
    FingerprintJS.load({apiKey: 'your-public-api-key'})
      .then(fp => fp.get())
      .then(result => console.log(result.visitorId));
  }
</script>
Note that you need to replace your-public-api-key with the actual Public API key you copied from your dashboard.
This function calls the Fingerprint service to create a visitorID and print it to the console. You can reload the registration page to see an alphanumeric hash in your JavaScript console.
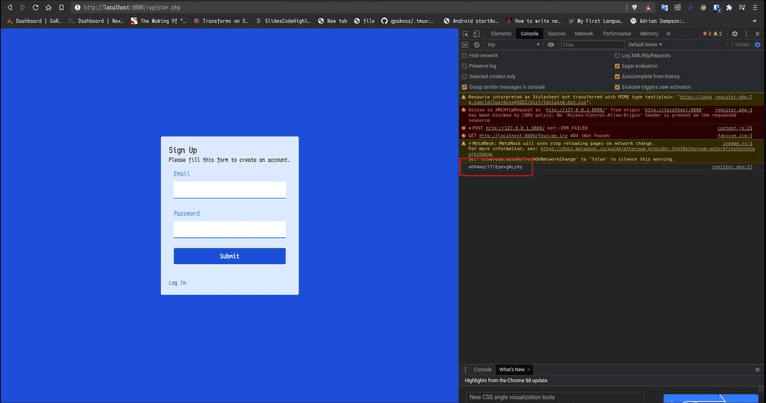
Now that you have a unique visitor ID, you can send this with every request and store it in your database after registration.
First, create a new column called visitorId on the users table:
ALTER TABLE users ADD COLUMN visitorId TEXT;Add the generated visitorId to the form as a hidden field:
<input name="visitorId" id="visitorId" value="" hidden>And change the initFingerprintJS() function to set the value of the field:
<script>
  function initFingerprintJS() {
    FingerprintJS.load({apiKey: 'your-public-api-key'})
      .then(fp => fp.get())
      .then(result => {
          document.getElementById('visitorId').value = result.visitorId
      });

  }
</script>
Now the visitorId needs to be saved in the database. Just like you did in the IP tracking part, modify the code so that the visitorId is saved:
$insert_stmt = $db->prepare("INSERT INTO users(email, password, visitorId) VALUES(?, ?, ?)");
$insert_stmt -> bindValue(1, $_POST["email"], SQLITE3_TEXT);
$insert_stmt -> bindValue(2, password_hash($_POST["password"], PASSWORD_BCRYPT), SQLITE3_TEXT);
$insert_stmt -> bindValue(3, $_POST['visitorId'], SQLITE3_TEXT);
Finally, you need to check if a user with the same visitorId already exists and shows an error message accordingly:
...
if($_SERVER["REQUEST_METHOD"] == "POST"){

    $ip_stmt = $db->prepare("SELECT * FROM users WHERE visitorId = ?");
    $ip_stmt->bindValue(1, $_POST['visitorId'], SQLITE3_TEXT);
    $res = $ip_stmt->execute();

    if(($res->fetchArray())[0]) {
        die("Looks like you are already registered. Please log in");
    }
    ...
}
You can test Fingerprint by registering a user and trying to register another user. Using your Fingerprint Pro-provided fingerprint, you will see the error message even if you use incognito mode, restart your browser, or disable cookies.
You can find all the above code for using Fingerprint inside the fingerprintjs directory in this GitHub repository.
Additional Server Validations
Before persisting the data in the storage layer, we recommend running some additional checks with our Server API. Once you obtain a visitorId on your backend, you can use our HTTP Server API or PHP Server API SDK to verify the identification request and to get additional contextual pieces of information.
In the example below, we check if the identification request has been recently performed by the provided requestId. Additionally, we also check the confidence score that represents the system's degree of certainty that the visitor identifier is correct.
In the following snippet, we use these variables and constants:
$fpjs_api_secretis Fingerprint Pro Secret API Key,$request_bodyis the content of the request’s body,$max_request_lifespanrepresents a number of how long should a request be valid,$minimum_confidence_scoreis a threshold for the confidence score.
$config = Configuration::getDefaultConfiguration($fpjs_api_secret);
$client = new FingerprintApi(
    new Client(),
    $config
);

// Get the identification data from the request
$event = $client->getEvent($request_body['requestId']);
$identification = $event->getProducts()->getIdentification()->getData();
$confidence = $identification->getConfidence()->getScore();

// Check the visitorId came from server api is not exact what user said to us
if ($identification->getVisitorId() !== $request_body['visitorId']) {
    throw new HttpBadRequestException("forged_visitor_id");
}

$now = time();
$identified_at = $identification->getTimestamp() / 1000;
$diff = $now - $identified_at;

// Check the difference between the identification timestamp and the request timestamp
if ($diff > $max_request_lifespan) {
    throw new HttpBadRequestException("forged_request_id");
}

// Check if the confidence score according to to your internal policy
if ($confidence <= $minimum_confidence_score) {
    throw new HttpBadRequestException("not_confident");
}

// All checks passed, the request and the visitorId are trustworthy
You can learn more about Fingerprint Pro PHP Server API SDK in the documentation or on GitHub.
Advantages of Fingerprint
Fingerprint Pro has many advantages over rolling out your fingerprinting solution. First, Fingerprint Pro is easy to use - you need to include a JavaScript snippet, and Fingerprint Pro handles the rest. This is much faster than writing your fingerprinting function in PHP.
Fingerprint Pro is also kept up-to-date with browser updates and modern fingerprinting best practices. This means you do not need to worry about your fingerprinting technique breaking when browsers are updated.
Fingerprinting vs. Session Tracking
One common tracking method in PHP is called session tracking. A session allows the server to store information about the current user and make it available across multiple pages to maintain the state.
The problem with session tracking is that they are tied to a session ID stored in the user’s browser (usually in a cookie). If you open an incognito window and try to register, it will be successful, even if you have a session in your other browser window. Users can open as many incognito windows as they want, and each will have a separate session in your application.
Additionally, sessions are not permanent. The session data deletes once the browser closes. Users can now restart their browser and register again.
If you’d like to demonstrate this behavior and compare it to the fingerprint example above, see the code inside the session directory in this GitHub repository.
Fingerprinting vs. HTTP Cookies
An HTTP Cookie is a small piece of data the server sends to the user’s browsers. Cookies are stored on the client and returned when making requests to the same server later.
Thus, a server can store information about the user in cookies - much like sessions - but the vital advantage of cookies over sessions is they’re not cleared when the browser is closed.
Like in session tracking, cookies will not work as intended in incognito mode since cookies are not saved in incognito mode. However, users can register as often as possible by opening new incognito windows.
Also, cookies are not permanent and can be cleared by the user or browser. For example, most popular browsers provide an option to clear cookies automatically when the browser is closed. Finally, cookies can be blocked by the browser entirely.
You can find a code sample using HTTP cookies inside the cookie directory in this GitHub repo.
Fingerprinting vs. IP Tracking
An IP or Internet Protocol address is similar to a street address for your computer: it is a numerical label assigned to a device whenever it connects to a network. By storing the IP address of a user when they register, you can tell when the same device tries to make another registration. In addition, you can use IP tracking to block the same user from accessing your site from incognito mode or different browsers.
Unfortunately, IP addresses are easily spoofed. Users can set them manually when browsing, even if they’re not using a proxy server. IP address tracking can also be inaccurate because different devices can have the same IP address when they share the same router. For example, multiple devices often share the same IP address in a university or organization network.
You can find a code sample using IP tracking inside the directory ip in the GitHub repository here.
Conclusion
In this tutorial, you learned how browser fingerprinting in PHP helps prevent duplicate registrations. While you can increase the accuracy of your tracking in PHP by combining sessions, cookies, and IP tracking, it’s still relatively easy for users to bypass these fraud detection measures.
Using Fingerprint to quickly and accurately generate a browser fingerprint in PHP will help you combat fraud and save time. With industry-leading accuracy, Fingerprint is an excellent solution for saving time, allowing you to focus on building a great web application and not learning every browser fingerprinting change.
