

Hosting a website or web app on the internet comes with risks. One such risk is that users might register multiple accounts with your service to take advantage of free trials.
Browser fingerprinting helps you mitigate this risk by creating unique fingerprint signatures for each browser used to access your website or web app. You can generate fingerprints using several methods, including canvas fingerprinting, WebGL fingerprinting, media device fingerprinting, and audio fingerprinting.
These methods let you gather information about a user's browser and device—like its operating system, browser version, installed fonts, screen resolution, and hardware configurations—to generate a unique fingerprint signature for the browser. You can then use the generated signature to identify a user's browser when they return to your site. The fingerprint even lets you identify browsers using incognito mode or over a VPN.
Using browser fingerprinting is more accurate than identification methods like cookies and IP addresses, where users can clear their cookies or connect to a different network or VPN. Because generating fingerprints uses so many factors as input, it's almost impossible for the user to change their browser's fingerprint.
This article will demonstrate using Fingerprint to generate browser fingerprints for an ASP.NET web application written in C#. The application will let users register an account. To prevent a user from registering multiple accounts, you'll generate a fingerprint for each user and store it in the database alongside the account data. If the user tries registering too many accounts within a certain period, you'll block subsequent registration attempts using their signature in the database.
Prerequisites
Before continuing, ensure you have the latest LTS version of .NET installed, which, at the time of writing, is .NET 8.0.2. The commands used in this article might not work with earlier versions of .NET. When downloading .NET, make sure to download the SDK installer, which lets you build apps.
When you installed the .NET SDK, it also installed the .NET CLI. This tool provides functionality to create, build, debug, and package .NET applications from the command line. You also get extensions for the .NET CLI that provide additional project templates, code generation capabilities, and more. You'll need to install two extensions that will help you when working with ASP.NET and databases. Run the following command in your terminal to install the scaffolding extension that you'll need to customize the registration page in ASP.NET:
dotnet tool install -g dotnet-aspnet-codegeneratorThen, run the following command to install an extension for working with databases:
dotnet tool install --global dotnet-efThis demonstration uses Fingerprint to generate browser fingerprints. Fingerprint specializes in collecting browser attributes to create highly accurate fingerprints, helping you identify users in your system. If you don't have a Fingerprint account yet, you can sign up for a free trial.
You're now ready to start coding!
Create the ASP.NET Application
Open a new terminal window and run the following command to create a new project:
dotnet new webapp --auth Individual -o FingerprintAspNetCoreThe .NET CLI will create a new project in the FingerprintAspNetCore folder because you specified the -o flag. The --auth Individual flag causes the project to be created with username and password authentication already implemented. If you wish, you can extend authentication to use third-party identity providers like Google, Facebook, and GitHub. For this demo, you'll only use the email and password authentication flow.
Open the folder using your preferred code editor or IDE. You'll notice that the .NET CLI has created a couple of files and folders for the project.
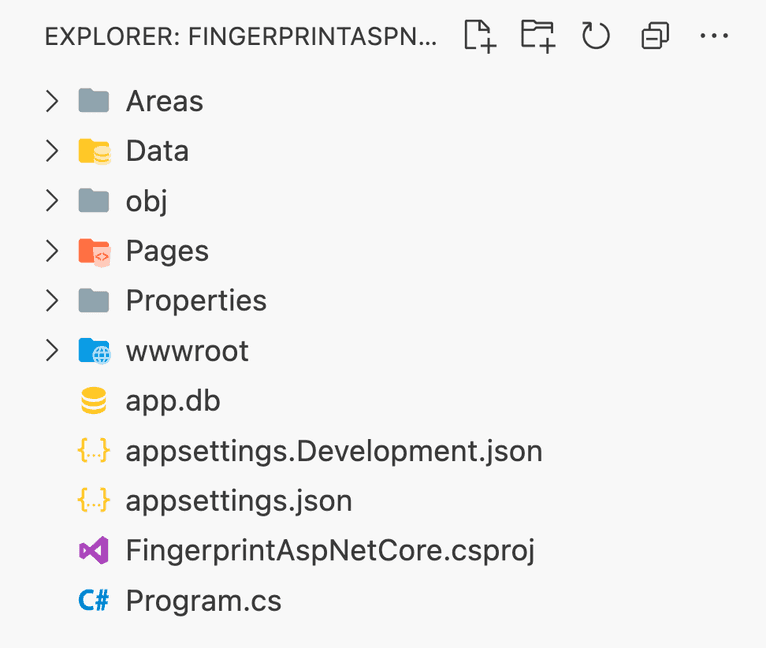
The Areas folder contains files related to the Identity package, which contains the authentication logic for your application. You'll find all the database-related logic and source code in the Data folder. The Pages folder contains your application's pages and data. Any static assets—such as images, JS, and CSS files—can be stored in the wwwroot folder. The app.db file is an SQLite database the application uses to store user information. Your application's configuration is set up in the appsettings.Development.json and appsettings.json files. Finally, the Program.cs file contains code to wire up different dependencies and build and start your app.
By default, the .NET CLI configures the project to use SQLite as a database. SQLite is a lightweight, self-contained, serverless SQL database that lets you create and use a SQL database from a single file. This self-contained database is perfect for a demo application since you don't need to install a database server. However, when building a production app, you'll want to configure your application to use a more robust database engine such as PostgreSQL or MySQL. Fortunately, Entity Framework, the default ORM used by ASP.NET, has adapters for several database engines.
Scaffold the Registration Page
Since you want to prevent users from creating too many user accounts in a certain period, you must customize the registration page. You'll generate a fingerprint on the registration page in the user's browser. Then, you'll send it to the server to validate and create the account if the fingerprint has not been used more than five times in the last week.
You'll use the scaffolding extension you installed in the prerequisites. However, before you can use it, you must install the Microsoft.VisualStudio.Web.CodeGeneration.Design package in your project using the following command:
dotnet add package Microsoft.VisualStudio.Web.CodeGeneration.DesignOnce the .NET CLI has downloaded the package, run the following command to scaffold files to customize the registration page:
dotnet aspnet-codegenerator identity -dc FingerprintAspNetCore.Data.ApplicationDbContext -fi "Account.Register"The -dc flag specifies which database context the tool should use when scaffolding the pages. Depending on what changes you've made to the user, the scaffolding tool might tweak the scaffolded registration page. The -fi lets you specify a semicolon-separated list of different pages you want to scaffold.
In this case, you just want to scaffold the Account.Register page.
Create the Fingerprint Field in the Database
To prevent duplicate accounts during registration, you must check whether the user's browser fingerprint already exists in a list of fingerprints belonging to other accounts in the system. You'll do this by storing the fingerprint with each user registration in the database.
When using Identity for authentication in ASP.NET, you have the option of adding properties to a user by creating a C# class for the user and inheriting the built-in IdentityUser class. You'll do this to store each user's fingerprint.
In the Data folder, create a new file called ApplicationUser.cs and paste the following code in it:
using Microsoft.AspNetCore.Identity;

namespace FingerprintAspNetCore.Data;

public class ApplicationUser : IdentityUser
{
    public string Fingerprint { get; set; }
    public DateTime RegistrationDate { get; set; }
}
The code file defines a new C# class called ApplicationUser. The class inherits all the existing user properties from IdentityUser and has new Fingerprint and RegistrationDate properties. You'll use the combination of these two fields to determine if a user is allowed to create another account.
After creating the ApplicationUser class, you must configure ASP.NET Core Identity to use the new class. Open the ApplicationDbContext.cs file and update the base class from IdentityDbContext to IdentityDbContext<ApplicationUser>, like this:
// ...

public class ApplicationDbContext : IdentityDbContext<ApplicationUser>
{
    // ...
}
This code instructs ASP.NET to use the ApplicationUser class instead of the default IdentityUser class for users in the database.
There are some references to IdentityUser in other files that you must update to point to the new ApplicationUser class. Open the Program.cs file, and update the ASP.NET Identity configuration to use ApplicationUser:
// ...

builder.Services.AddDefaultIdentity<ApplicationUser>(options => options.SignIn.RequireConfirmedAccount = true)
    .AddEntityFrameworkStores<ApplicationDbContext>();

// ...
Then, open the Register.cshtml.cs file in the Areas/Identity/Pages/Account directory and update all the references to use ApplicationUser, like this:
using FingerprintAspNetCore.Data;
// ...

namespace FingerprintAspNetCore.Areas.Identity.Pages.Account
{
    public class RegisterModel : PageModel
    {
        private readonly SignInManager<ApplicationUser> _signInManager;
        private readonly UserManager<ApplicationUser> _userManager;
        private readonly IUserStore<ApplicationUser> _userStore;
        private readonly IUserEmailStore<ApplicationUser> _emailStore;
        private readonly ILogger<RegisterModel> _logger;
        private readonly IEmailSender _emailSender;

        public RegisterModel(
            UserManager<ApplicationUser> userManager,
            IUserStore<ApplicationUser> userStore,
            SignInManager<ApplicationUser> signInManager,
            ILogger<RegisterModel> logger,
            IEmailSender emailSender)
        {
            _userManager = userManager;
            _userStore = userStore;
            _emailStore = GetEmailStore();
            _signInManager = signInManager;
            _logger = logger;
            _emailSender = emailSender;
        }

        // ...

        private ApplicationUser CreateUser()
        {
            try
            {
                return Activator.CreateInstance<ApplicationUser>();
            }
            catch
            {
                throw new InvalidOperationException($"Can't create an instance of '{nameof(ApplicationUser)}'. " +
                    $"Ensure that '{nameof(ApplicationUser)}' is not an abstract class and has a parameterless constructor, or alternatively " +
                    $"override the register page in /Areas/Identity/Pages/Account/Register.cshtml");
            }
        }

        private IUserEmailStore<ApplicationUser> GetEmailStore()
        {
            if (!_userManager.SupportsUserEmail)
            {
                throw new NotSupportedException("The default UI requires a user store with email support.");
            }
            return (IUserEmailStore<ApplicationUser>)_userStore;
        }
    }
}
Finally, open the _LoginPartial.cstml file in the Pages/Shared directory and update the references at the top of the file:
@using Microsoft.AspNetCore.Identity
@inject SignInManager<ApplicationUser> SignInManager
@inject UserManager<ApplicationUser> UserManager

// ...
As a final step, you must create a database migration and apply it to the SQLite database so that you can create the new field in the actual database. Create a database migration using the following command in your terminal:
dotnet ef migrations add "AddFingerprintAndRegistrationDateToAspNetUser"Now run the migration on the SQLite database using the following command:
dotnet ef database updateNow that you've created the new field in the database, you can work on generating the fingerprint.
Configure FingerprintJS in the User's Browser
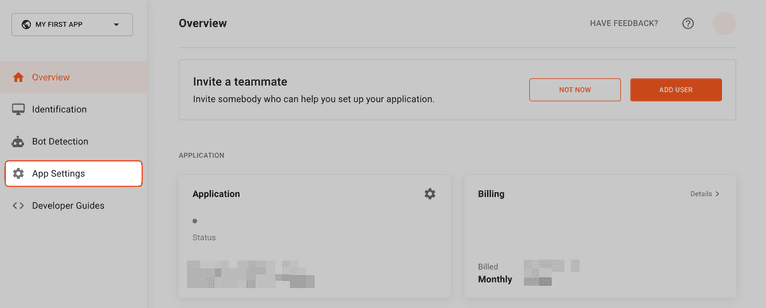
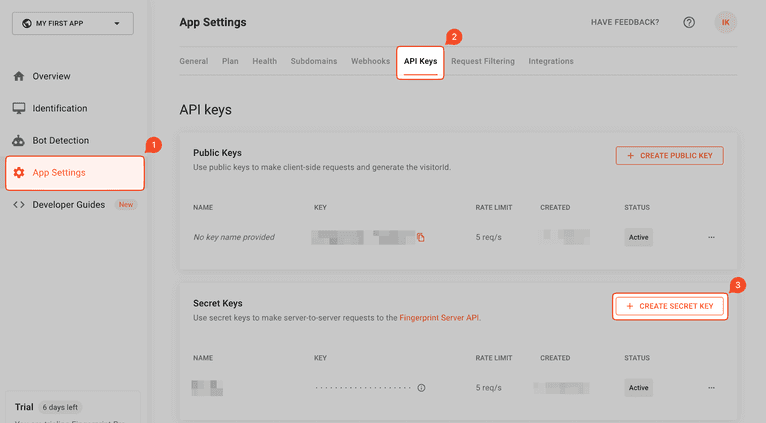
Because a fingerprint uses different inputs in the user's browser, you have to generate the fingerprint client-side using JavaScript. Fortunately, Fingerprint makes this easy with their Fingerprint JavaScript agent. To get started, go to the Fingerprint Dashboard and click on App Settings in the left menu:
In the screen that appears, click on the Integrations tab. You'll use a JavaScript script on your registration page, so click on JavaScript.
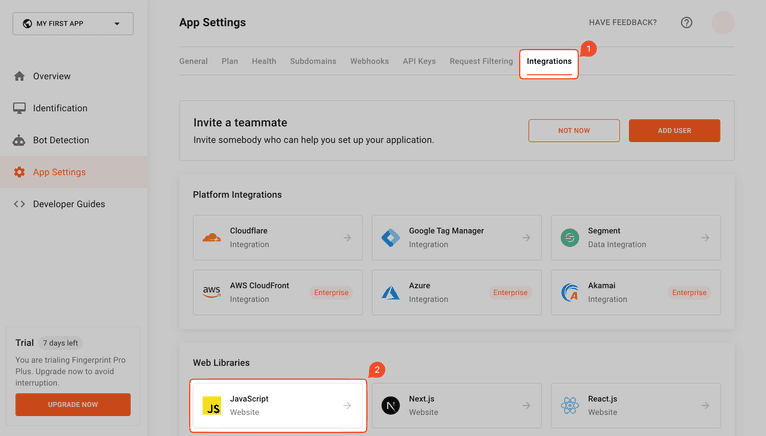
A JavaScript snippet will appear to generate a browser fingerprint using Fingerprint.
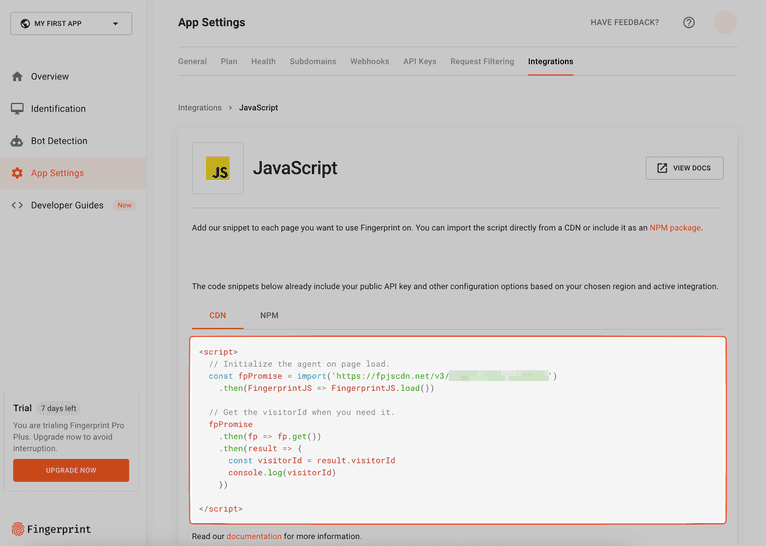
Copy the snippet and open the Register.cshtml file in the Areas/Identity/Pages/Account directory. At the bottom of the file, paste the snippet in the @section Scripts block near the end:
// ... @section Scripts {
<partial name="_ValidationScriptsPartial" />

<script>
  // Initialize the agent on page load.
  const fpPromise = import("https://fpjscdn.net/v3/PUBLIC_API_KEY").then(
    (FingerprintJS) => FingerprintJS.load()
  );

  // Get the visitorId when you need it.
  fpPromise
    .then((fp) => fp.get())
    .then((result) => {
      const visitorId = result.visitorId;
      console.log(visitorId);
    });
</script>
}
Notice how the script you pasted only prints the visitorId to the console once the library has calculated the browser fingerprint. Instead of this, you'll need to send this data to the server to be verified and stored in the database.
In the middle of the file, you'll find the registration form. You can use hidden fields in this form to submit the necessary information from Fingerprint. To verify the fingerprint, you need both the Visitor ID and Request ID generated by Fingerprint. Add two hidden fields above the Register button:
// ...
<div class="row">
  <div class="col-md-4">
    <form
      id="registerForm"
      asp-route-returnUrl="@Model.ReturnUrl"
      method="post"
    >
      // ...

      <div class="form-floating mb-3">
        <input
          asp-for="Input.ConfirmPassword"
          class="form-control"
          autocomplete="new-password"
          aria-required="true"
          placeholder="password"
        />
        <label asp-for="Input.ConfirmPassword">Confirm Password</label>
        <span
          asp-validation-for="Input.ConfirmPassword"
          class="text-danger"
        ></span>
      </div>
      <input asp-for="Input.VisitorId" class="d-none" id="visitorId" />
      <input asp-for="Input.RequestId" class="d-none" id="requestId" />
      <button
        id="registerSubmit"
        disabled="disabled"
        type="submit"
        class="w-100 btn btn-lg btn-primary"
      >
        Register
      </button>
    </form>
  </div>
  // ...
</div>
// ...
Each input is hidden from the user. Don't worry about the asp-for attributes for now as you'll see how those get used in the next section. Notice that the Register button is disabled by default. Once the fingerprint is calculated, the button will be enabled. This prevents the user from submitting a registration until the fingerprint information is set.
All that's left is to update the form fields with the results from Fingerprint and enable the Register button. Update the JavaScript script at the bottom of the file to set the value of the two hidden forms appropriately:
// ... @section Scripts {
<partial name="_ValidationScriptsPartial" />

<script>
  // Initialize the agent on page load.
  const fpPromise = import('https://fpjscdn.net/v3/PUBLIC_API_KEY)
    .then(FingerprintJS => FingerprintJS.load())

  // Get the visitorId when you need it.
  fpPromise
    .then(fp => fp.get())
    .then(result => {
      document.querySelector("#visitorId").value = result.visitorId;
      document.querySelector("#requestId").value = result.requestId;
      document.querySelector("#registerSubmit").disabled = false;
    })
</script>
}
Now that you're able to generate browser fingerprints for users on the web page, you must update the backend logic in ASP.NET.
Verify and Store the Fingerprint
Now that you have all the necessary data to identify the user's browser, you must verify the incoming data to ensure it hasn't been tampered with.
First, update the InputModel class in the Register.cshtml.cs file to include fields for the incoming data. The snippet below shows the two fields you need to add to the InputModel class:
namespace AspNetFingerprint.Areas.Identity.Pages.Account
{
    public class RegisterModel : PageModel
    {
        // ...

        public class InputModel
        {
            // ...

            [Required]
            public string VisitorId { get; set; }

            [Required]
            public string RequestId { get; set; }
        }

        // ...
    }
}
These properties are set in the web page using the asp-for attributes you saw in the previous section.
Now that you're receiving the data in the backend, you can't simply trust it hasn't been maliciously changed. The user might have tampered with the fingerprint data before submitting the registration. The Fingerprint Server SDK provides methods that help you double-check the provided signature to ensure it's legitimate. Install the FingerprintPro.ServerSdk NuGet package using the following command:
dotnet add package FingerprintPro.ServerSdkYou'll need an API Key for Fingerprint before you can use the package. In the Fingerprint dashboard, click on App Settings in the left menu. On the page that appears, select the API Keys tab and click on the CREATE SECRET KEY button.
In the dialogue that appears, give your secret key a suitable name. Leave the other fields with the default values selected and click CREATE API KEY.
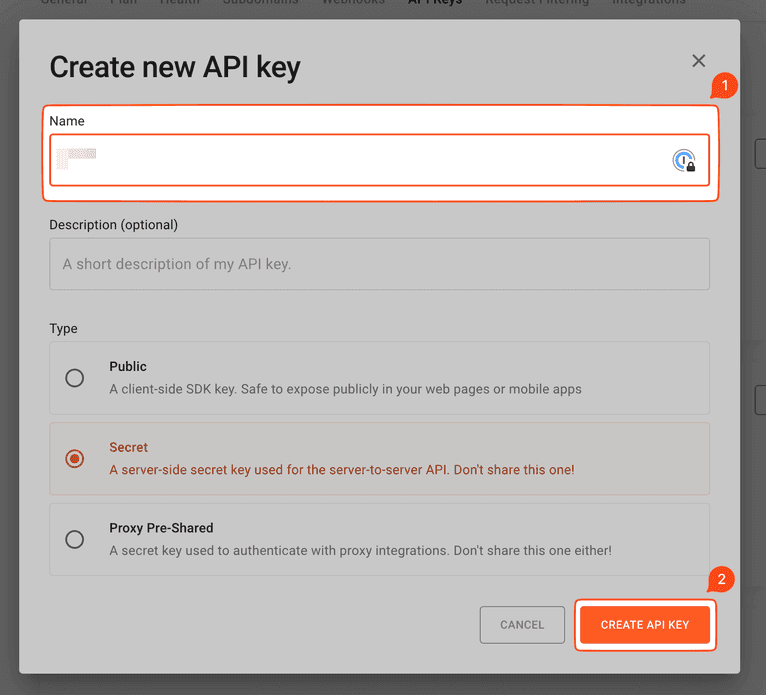
Your API key will appear on the next screen. Because it's a secret key, copy it before closing the dialog as you won't be able to view it again.
Head over to your ASP.NET project and open the appsettings.json file. Add a property called "FingerprintApiKey" and paste the API key you just created as the value:
{
  // ...
  "FingerprintApiKey": "SECRET_API_KEY"
}
Now move to the Program.cs file, where you must configure and register the Fingerprint API service to use the API key in the configuration file. Add the following snippet close to the top of the Program.cs file, where other services are added:
using Microsoft.EntityFrameworkCore;
using FingerprintAspNetCore.Data;
// Add the Fingerprint SDK namespaces
using FingerprintPro.ServerSdk.Api;
using FingerprintPro.ServerSdk.Client;

var builder = WebApplication.CreateBuilder(args);

// ...
builder.Services.AddDatabaseDeveloperPageExceptionFilter();

// Retrieve the FingerprintApiKey and use it to configure a new `IFingerprintApi` service.
var fingerPrintApiKey = builder.Configuration["FingerprintApiKey"]
                        ?? throw new System.Configuration.ConfigurationErrorsException("The FingerprintApiKey property is required.");
builder.Services.AddSingleton<IFingerprintApi>(new FingerprintApi(new Configuration(fingerPrintApiKey)));

builder.Services.AddDefaultIdentity<ApplicationUser>(options => options.SignIn.RequireConfirmedAccount = true)
    .AddEntityFrameworkStores<ApplicationDbContext>();

// ...
The snippet above first retrieves the FingerprintApiKey value from the app configuration. If no API key is set, the code throws an exception and terminates. After retrieving the API key, you pass it to the FingerprintApi and register the service in ASP.NET.
With the Server SDK set up, open the Register.cshtml.cs file and find the OnPostAsync method. The method currently has logic to create a new user, set their properties, and save them to the database. You must add code before this logic to also verify the fingerprint before creating the user, as shown in the snippet below:
// ...
using FingerprintPro.ServerSdk.Api;

namespace AspNetFingerprint.Areas.Identity.Pages.Account
{
    public class RegisterModel : PageModel
    {
        // ...
        private readonly ApplicationDbContext _applicationDbContext;
        private readonly IFingerprintApi _fingerprintApi;

        public RegisterModel(
            UserManager<ApplicationUser> userManager,
            IUserStore<ApplicationUser> userStore,
            SignInManager<ApplicationUser> signInManager,
            ILogger<RegisterModel> logger,
            IEmailSender emailSender,
            ApplicationDbContext applicationDbContext,
            IFingerprintApi fingerprintApi)
        {
            // ...
            _applicationDbContext = applicationDbContext;
            _fingerprintApi = fingerprintApi;
        }

        // ...

        public async Task<IActionResult> OnPostAsync(string returnUrl = null)
        {
            returnUrl ??= Url.Content("~/");
            ExternalLogins = (await _signInManager.GetExternalAuthenticationSchemesAsync()).ToList();
            if (ModelState.IsValid)
            {
                /*
                 * Fingerprint validation
                 */
                var fingerprintEvent = await _fingerprintApi.GetEventAsync(Input.RequestId);
                var identification = fingerprintEvent.Products.Identification.Data;
                var confidence = identification.Confidence.Score;

                // Check that the Visitor ID submitted in the form matches the Visitor ID returned by
                // Fingerprint for the RequestId. This prevents users from forging the Visitor ID.
                if (identification.VisitorId != Input.VisitorId)
                {
                    ModelState.AddModelError(string.Empty, "Forged Visitor ID.");
                    return Page();
                }

                // Make sure that the Request ID is not older than two minutes. This prevents malicious
                // users from reusing an old Visitor and Request ID to make a request.
                var identifiedAt = DateTimeOffset.FromUnixTimeMilliseconds(identification.Timestamp ??
                                                                           throw new FormatException(
                                                                               "Missing identification timestamp"));
                if (DateTimeOffset.UtcNow - identifiedAt > TimeSpan.FromMinutes(2))
                {
                    ModelState.AddModelError(string.Empty, "Expired identification timestamp.");
                    return Page();
                }

                // Fingerprint returns a confidence value that represents how accurately the visitor was
                // identified. If the identification confidence is less than 90%, then reject the registration
                // request.
                if (confidence < 0.9f)
                {
                    ModelState.AddModelError(string.Empty, "Low confidence identification score.");
                    return Page();
                }

                // Query the database and block the registration request if five or more accounts have
                // been registered with the same Visitor ID in the last seven days (week).
                var startDate = DateTime.UtcNow.AddDays(-7);
                if (_applicationDbContext.Users.Count(x => x.Fingerprint == Input.VisitorId &&
                                                           x.RegistrationDate >= startDate) >= 5)
                {
                    ModelState.AddModelError(string.Empty, "You cannot register another account using this browser.");
                    return Page();
                }


                var user = CreateUser();

                await _userStore.SetUserNameAsync(user, Input.Email, CancellationToken.None);
                await _emailStore.SetEmailAsync(user, Input.Email, CancellationToken.None);
                // Set the user's Fingerprint field to the Visitor ID from Fingerprint
                user.Fingerprint = Input.VisitorId;
                user.RegistrationDate = DateTime.UtcNow;


                var result = await _userManager.CreateAsync(user, Input.Password);

                // ...
        }

        // ...
    }
}
The snippet first injects the IFingerprintApi service you registered. Then, it uses the service in the OnPostAsync method to retrieve details about the fingerprint using the Request ID. The Server SDK returns the Visitor ID related to that Request ID. If the Visitor ID returned by the Server SDK matches the Visitor ID submitted in the form, you know the submitted Visitor ID wasn't tampered with.
After that, the code checks how old the fingerprint is to prevent the user from injecting old fingerprints in the request. In this case, if the fingerprint is older than two minutes, it returns an error.
The next check involves making sure the fingerprint generated on the web page has a high-enough confidence score. If it's too low, it means you can't reliably trust that Fingerprint will be able to reproduce the same fingerprint in the same browser next time.
The last one checks how many accounts have been registered with the same Visitor ID in the last seven days using the Fingerprint and RegistrationDate properties. If more than five accounts were registered in the past week, the app returns an error and doesn't create an account for the user.
If all validations pass, the code sets the Fingerprint and RegistrationDate properties on the user to Input.VisitorId and current date, respectively. The process finishes by creating the user account in the database.
Test the Web Application
You're now ready to test your app.
Enter the following command in your terminal:
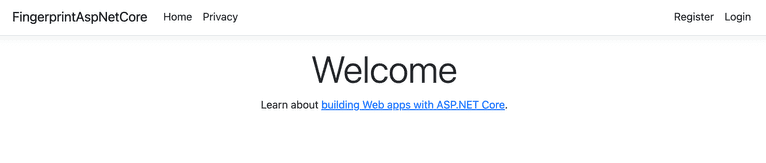
dotnet runOpen https://localhost:5290 (adjust the port if your system runs it on a different one). You should see a home screen similar to the one below:
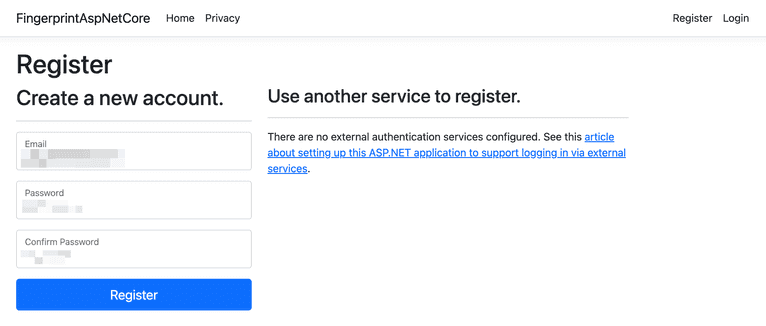
Click on Register in the top-right menu. Enter details for a new account and submit the form:
If your registration was successful, you should see a success page with a link to confirm your account. Confirm your account and try to log in to the application to make sure authentication is working.

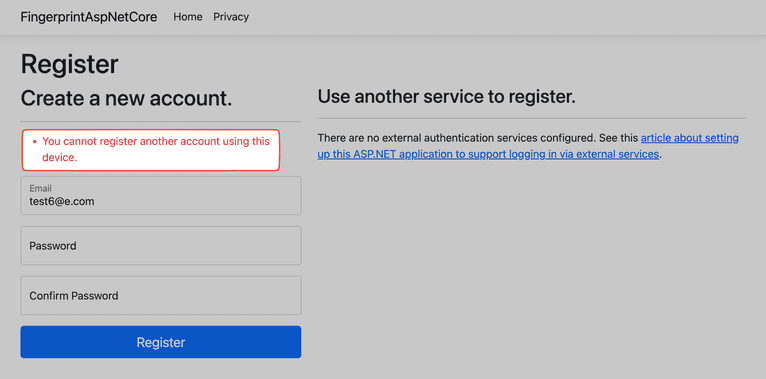
To test the browser fingerprint functionality, create a few more accounts from the same browser. When creating your sixth account, you should see an error similar to the one below:
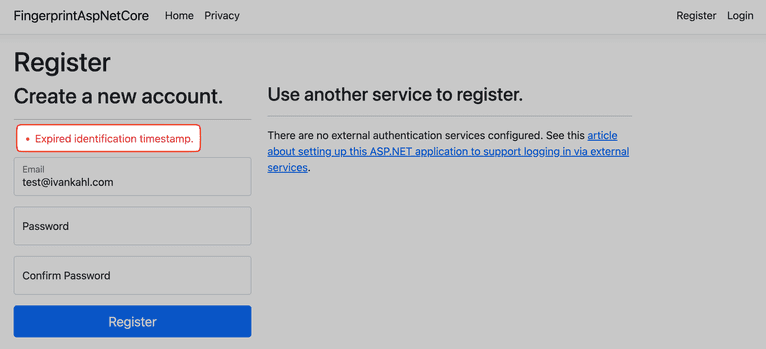
You can play around with the registration page some more to test all the validations you added in the backend. For example, test the timeout by loading the registration page and then waiting a few minutes before submitting it. If the fingerprint data expired, you should see the following error:
If your app passes all these tests, congratulations! You've successfully implemented additional security in an ASP.NET web app that prevents users from registering too many accounts in a short period.
You can find the final demo application source code on GitHub.
Conclusion
This article demonstrated how easy it is to protect your web application from users trying to take advantage of discounts and trials. Generating and storing fingerprints with your users' accounts allows you to identify if the same browser is used to register an excessive number of accounts. While browser fingerprinting is just one protection to guard against such exploits, it's an effective one that's difficult to bypass.
Fingerprint makes it easy to integrate browser fingerprinting into your website for enhanced security and tailored customer experiences. It offers libraries and packages for several frontend and backend frameworks and programming languages so that you can integrate fingerprinting into almost any technology stack.
Reach out to our team to discover how Fingerprint can help you.
FAQ
Browser fingerprinting is a method to uniquely identify website users by analyzing details about their web browsers to generate an identifier. This information can include details like browser version, screen resolution, and installed fonts to uniquely identify a user's device.
Adding browser fingerprinting to your app can enhance security by detecting and preventing fraudulent activities. It can also be used to improve user experience by enabling personalized settings without requiring logins.
Browser fingerprinting provides a much more persistent form of visitor identification than cookies, which users can easily clear or block. It allows for effective identification and fraud detection capabilities even with stricter privacy settings and cookie restrictions.


